Using the Photoshop format plug-in
Photo Ninja includes a file format plug-in for Adobe Photoshop. The plug-in allows Photo Ninja to open RAW files for Photoshop without the inconvenience of intermediate files. Photoshop asks Photo Ninja to open and process the file, and the processed pixels are sent directly to Photoshop. This can be convenient if you often do retouching or masking in Photoshop after RAW conversion in Photo Ninja.
Before you can use the format plug-in, you must install, activate, and configure it as described here
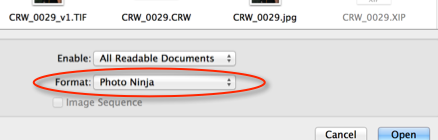
To use the format plug-in, simply open a RAW file in Photoshop. You can use the File->Open command in Photoshop, or you can use the "Open" command in Adobe Bridge or the "Edit in..." command in a browser application like Photo Mechanic.
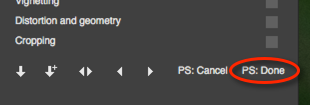
When Photo Ninja Photoshop should launch Photo Ninja automatically and ask it to open the specified image. Make your edits in Photo Ninja, then press the "PS:Done" button to send the result back to Photoshop, or "PS:Cancel" to abort:
In the Photoshop page of Photo Ninja's preferences dialog, you can choose whether Photo Ninja should keep running after you send an image back to Photoshop:
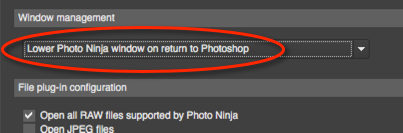
If you let it keep running, then subsequent images will open faster because the startup overhead will be avoided.
NOTE: The format plugin does not support invocation from a Photoshop action or smart filter. Consider using Photo Ninja's native batch processor if you want to automate the processing of multiple RAW files.
NOTE: [Mac only] In the Photoshop Open dialog on Mac, there is a drop-down list that allows you to choose between Photo Ninja and Adobe Camera Raw for individual images.
NOTE: In Adobe Bridge, you can use the "Open" and "Open in Camera Raw" commands to switch between the Photo Ninja and Adobe Camera Raw converters.
NOTE: Photo Ninja also includes a filter plug-in for Photoshop. To learn about it, click here.